Last updated: November 14, 2026
Quick answer: for most kayaks, the right setup starts with the hull and the load, then uses one main mounting system plus one secondary option, not a full deck of hardware.
This guide to kayak setup and mounting systems — The Complete Guide sorts out which mounting system fits which kayak, what to install first, and what to avoid when you don’t want to drill the wrong hole.
Key Takeaways
- Start with the kayak’s built-in mounting points; hull shape and wall thickness still decide what holds safely.
- Deck thickness, gear weight, and how often you move the accessory drive the mount choice.
- Track mounts suit adjustable layouts, flush mounts suit low-profile gear, and through-bolts suit fixed strength.
- For electronics, keep the display visible, the transducer in clean water, and the cable short and protected.
In short: start with the kayak, not the accessory

A good kayak setup starts with the kayak’s existing mounting points, because the hull shape and wall thickness decide what will hold safely.
A sit-on-top fishing kayak with molded-in tracks gives you a very different path than a 12-foot touring kayak with a thin deck and almost no flat space. That is why kayak setup and mounting systems need to be matched to the boat, not the box.
This guide to kayak setup and mounting systems — The Complete Guide sorts out which mounting system fits which kayak, what to install first, and what to avoid when you don’t want to drill the wrong hole. The topic matters because a 10-foot recreational kayak and a 14-foot fishing kayak often need different solutions, even when the accessories look the same.
Picture this: you’re staring at a bare deck, one rod holder in a box, a fish finder, and a phone mount, and you want all of it mounted without turning the kayak into a wobbly mess. The answer is to plan around load, reach, and access, not around the order of the parts in the package. A mount can be strong and still be wrong if it puts weight too high or blocks a hatch.
The first three questions to answer are simple:
- What kayak do you have? Sit-on-top, sit-inside, inflatable, tandem, or pedal drive.
- What are you mounting? Rod holder, electronics, camera, anchor trolley, paddle clip, cup holder, motor, or crate.
- How permanent should it be? Quick swap, season-long, or drilled-in and left alone.
Therefore, mounting systems are not interchangeable in practice, even when the bolts look the same. A track mount works well for gear you move often. A through-bolted base makes sense for parts that need to stay put. A glue-on pad can be right for a smooth deck, but it is a poor choice for heavy leverage.
One more thing: if the gear affects steering, balance, or safety, treat the setup like a system, not a shopping list, and consult a professional if you are unsure. The U.S. Coast Guard Boating Safety guidance is a useful starting point for safe on-water decisions, especially when added weight or powered gear changes how a kayak behaves.
Quick check: If you’re still choosing between track, bolt, and glue-on, you need the hull and the gear list before you buy anything else.
What actually determines the right mounting system?
The right mounting system is usually determined by deck thickness, gear weight, and how often you need to move the accessory.
A light phone cradle and a 3-pound fish finder belong in different mounting worlds, and a kayak’s hull usually makes that choice for you.
Picture this: you’ve got a 10-foot recreational kayak with a smooth deck and a 14-foot fishing kayak with molded tracks on both sides. The same rod holder could work on both, but the path to a clean install is not the same. On the first kayak, you may need a backing plate and a careful drill pattern. On the second, a simple track adapter may be enough.
Here’s the catch: the mount itself is only half the story. The base, the fasteners, the backing material, and the hardware height all matter. A mount that looks sturdy can fail if it flexes the deck or twists under torque.
A useful way to decide is by these conditions:
| Situation | Best Path | Why Other Options Fail |
|---|---|---|
| Thin plastic deck, no tracks | Through-bolt with backing plate | Adhesive pads can peel under heat; clamp-ons slip on curved surfaces |
| Molded-in accessory track | Track mount | Drilling adds holes you don’t need and weakens a clean deck |
| Heavy gear with constant pull, like a net holder or motor bracket | Through-bolt with large backing | Quick-release mounts can rattle loose over time |
| Gear you swap often, like a camera arm or GPS cradle | Track mount or RAM-style ball on track base | Fixed mounts make adjustments slow and awkward |
| Smooth inflatable tube or very soft surface | Purpose-built inflatable-friendly mount | Standard bolts and hard clamps can damage the material |
A few benchmarks help here. If the accessory has a long arm or carries weight away from the deck, the mount needs more surface and better backing. If the part will be removed every trip, use a system that accepts repeated tightening without chewing up the hardware. If the load is modest and fixed, a simpler mount is usually the cleaner answer.
Do not ignore service access. If the nut sits under a hatch you can barely reach, the “stronger” install may become a headache the first time you need to change it.
Because of that, the best setup is often the one that gives you the least drama on the second install, not the first. For more on accessory placement and load planning, see track mounts, flush mounts, and through-bolts.
Quick check: If the accessory will sit high, carry real weight, or get swapped a lot, the mount type matters more than the brand name.
Track mounts, flush mounts, and through-bolts: what each one does best
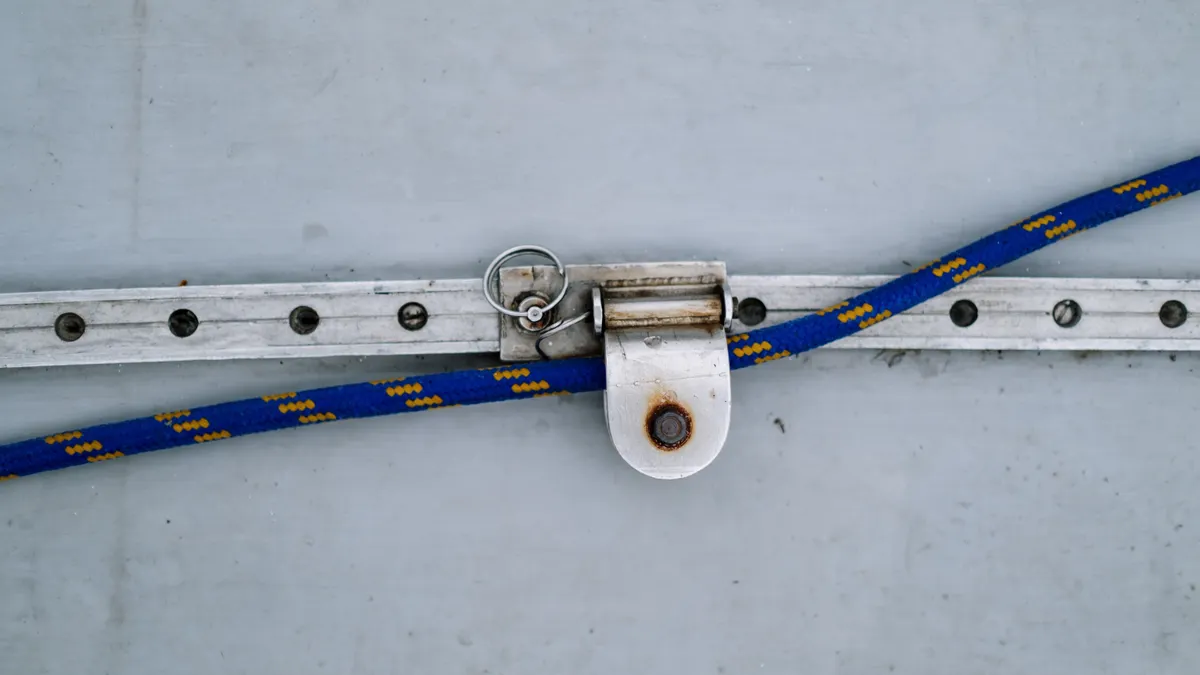
Track mounts are best for flexible layouts, flush mounts are best for low-profile gear, and through-bolts are best for permanent strength.
That sounds neat on paper, but the real choice depends on whether you care more about adjustment, snag reduction, or brute holding power.
Picture this: you’re running a rod holder, a fish finder arm, and a GoPro on the same kayak. If every one of those parts is drilled in place, you’ll hate the first adjustment. If every one rides on tracks, the deck can get cluttered fast. The smart setup mixes systems.
Track mounts
Track systems are the most forgiving option for kayak anglers and paddlers who still like to rearrange gear. A track lets you slide a base forward, back, or sideways, then lock it in with a knob.
Use track mounts for:
- rod holders
- transducer arms
- camera arms
- phone or GPS cradles
- crate tie-down points
Track mounts shine because they let you fine-tune reach and angle without new holes. The downside is that tracks have limits. A long arm can twist them, cheap hardware can slip, and crowded tracks turn into a tangle if you try to mount too many things in one rail.
Flush mounts
Flush mounts sit low and are common for rod holders and small fittings. They keep the deck cleaner and reduce snag points. That makes them useful in tight cockpits, where a tall base would catch a paddle, line, or clothing.
Use flush mounts for:
- fixed rod tubes
- compact accessories
- places where a low profile matters more than adjustment
Flush mounts are not ideal when you need aim or angle changes. Once installed, they usually stay where they are. They also need enough deck depth under the hole, which some kayaks do not have.
Through-bolts
Through-bolting is the strongest common method for many kayak installs. You drill through the deck, run the fastener through, and use washers or a backing plate underneath.
Use through-bolts for:
- heavier accessories
- items that need to resist torque
- mounts you do not plan to move often
The trade-off is obvious: once you drill, you own the hole. If the install is off-center or the gasket is poor, water can seep in. You also need access underneath, which can be tricky on sealed hulls.
A clean install usually means:
- stainless hardware where appropriate
- a properly sized backing plate or large washers
- marine sealant if the accessory calls for it
- no over-tightening that crushes the plastic
So, the choice is not about one “best” mount for every kayak setup. It is about matching the mount to the load, the layout, and the amount of movement you need. For a related fit check, see what determines the right mounting system.
Quick check: If you want adjustability, start with track; if you want low profile, start with flush; if you want the strongest fixed hold, use through-bolts.
Which setup works best for a fishing kayak?
A fishing kayak usually works best with a mixed setup: tracks for moving gear, flush mounts for fixed rods, and a secured battery or crate below deck or at the stern.
That layout keeps the deck usable while still putting the heavy or awkward parts where they won’t throw off balance. If you want the broader planning logic, this is where kayak setup and mounting systems move from theory into layout.
Picture this: you’re standing or sitting in a 12- to 14-foot fishing kayak, and the day starts calm but ends with wind from the side. A rod holder mounted too far out can become a lever. A fish finder mounted too high can block your paddle stroke or catch a net. A crate that slides even a few inches can make the kayak feel odd. The fix is to separate active gear from static gear.
Use this order:
- Put the seat and pedals first. Before any accessory, confirm that the seat position, foot braces, and pedal drive leave a clear working space.
- Install fixed rod positions. Flush mounts or low-profile holders work well for spare rods you don’t move every cast.
- Add a track or two for active gear. Put your fish finder arm, camera mount, or phone cradle on a track so you can move it after your first trip.
- Place the transducer with clean water flow. The transducer needs a spot that stays in contact with water and stays clear of turbulence from scuppers, pedals, or the hull shape.
- Secure the battery and cable path. If the battery or cable layout affects balance or access, consult the sonar maker or a qualified installer; keep wiring short, protected, and away from foot traffic, using cable clips or a covered route, not loose loops on deck. See RAM Mounts’ fish finder mounting guidance and the sonar manufacturer’s installation instructions for the exact unit.
- Test the load before you add more. Put the full rig on the water, then check whether the rod holder hits your paddle, the display blocks your view, or the crate shifts under acceleration.
A good fishing setup also respects retrieval. You should be able to grab a rod, net, or kill switch without reaching around a tower of accessories. A clean deck is not just prettier; it’s safer when a fish is on and your hands are busy.
One more hard rule: do not mount a heavy item on a thin sidewall just because the spot looks empty. Side loads can distort lighter plastics, and that damage shows up later as wobble or stress cracks.
Quick check: If your kayak carries a battery, multiple rods, and electronics, split the load between fixed mounts and adjustable mounts.
How do you mount electronics and transducers without making a mess?
Mounting electronics works best when the display is easy to see, the transducer sits in clean water, and the power cable stays short and protected.
The fish finder is the most common place for a bad rig to turn into a daily annoyance.
Picture this: you’ve got a compact sonar unit, a battery in a dry bag, and a transducer arm that looks easy enough to install. The temptation is to put the screen wherever it fits. That usually means the wrong angle, a cable snag, or a transducer that reads turbulence instead of water.
Start with the display. It should sit where you can glance down without twisting your torso or lifting your paddle stroke. A ball-and-socket arm on a track base is common because it gives you angle control without permanent commitment. If the screen is heavy or the arm is long, keep it lower and closer to the centerline.
Now the transducer. The two main questions are: can it stay in the water, and can it stay out of turbulent flow? Many kayak anglers use a scupper or side-arm style mount, while others use an internal or shoot-through approach when the hull and sonar model allow it. The best answer depends on the hull material, the sonar unit, and whether you’re willing to give up a little performance for a cleaner deck. For unit-specific details, consult the sonar maker’s installation guide, such as Garmin’s support and mounting documentation or the equivalent instructions from your model’s manufacturer.
For the wiring, keep these rules:
- Use the shortest practical cable run.
- Protect the cable from foot drag and hatch lids.
- Leave a little service loop, but not enough to snag.
- Keep connectors dry and accessible.
- Route the power away from sharp edges and hot spots.
If the system includes a battery, secure it with a box or strap that won’t shift when the kayak leans. A loose battery inside a hull is a bad idea on a hard lean or a quick landing.
One useful benchmark: if you can’t remove the display or battery without tearing the whole front of the kayak apart, the setup is too fussy. Simple is not lazy here. It’s smart.
A clean electronics install also helps the rest of the kayak setup stay usable, because fewer loose wires mean fewer snags when you cast or land a fish. For more on deck planning, see the fishing kayak layout.
Quick check: If the screen blocks your stroke, the transducer reads noise, or the cable crosses your feet, the electronics setup needs a reset.
What should you do if you’re using a sit-inside, inflatable, or lightweight kayak?
A sit-inside, inflatable, or lightweight kayak usually needs fewer hard mounts and more removable gear.
These boats often have less deck space, thinner walls, or softer material, so the normal fishing-kayak answer can be the wrong one.
Picture this: you’re working with a compact kayak that was built for simple paddling, not a full rack of accessories. A big through-bolted setup can be overkill. A track system may not exist. A clamp that looks clever in a photo may slide under load or damage the tube or shell.
Sit-inside kayaks
With a sit-inside kayak, deck space is tight and knee room matters. Small flush mounts, clamp-on accessories, and low-profile gear usually make more sense than a tall side rail.
Best choices:
- compact rod holders
- small deck bags
- low phone mounts
- simple cup or GPS holders
What fails here:
- tall fixed arms
- wide accessory bases
- hardware that blocks the cockpit rim
Inflatable kayaks
Inflatables need special care. The surface flexes, so standard rigid mounts can bite into the material or shift as the boat moves. Some inflatable-friendly systems use reinforced attachment points or purpose-built rails made for soft hulls.
Best choices:
- inflatable-specific mounts
- gear tied to reinforced points
- lighter accessories only
What fails here:
- over-tightened clamps
- metal hardware with sharp edges
- heavy electronics hung off a soft side tube
Lightweight recreational kayaks
A lightweight kayak can handle modest accessories, but you should keep the setup simple. A pair of flush mounts and a small track often beats a full rig.
Best choices:
- one or two accessories only
- low weight and low profile
- removable components
What fails here:
- too many drilled holes
- hardware that crowds the deck
- weight placed far from the centerline
A practical rule helps here: if the kayak flexes visibly when you press the deck, treat every mount as if it must work with movement, not against it.
That advice keeps the kayak setup and mounting systems aligned with the hull instead of fighting it. For a broader fit check, see the three conditions that change everything.
Quick check: If your kayak is soft, narrow, or short on deck space, choose lighter, lower, and more removable gear.
The 3 conditions that change everything
Three conditions change almost every mounting decision: hull material, gear leverage, and access to the underside.
If you miss one of these, a mount that looks fine on the bench can become a pain on the water.
Picture this: two kayaks, same length, same brand of rod holder, but one is rotomolded plastic, one is inflatable, and one has a sealed rear compartment with almost no access underneath. The same advice won’t fit all three.
1) Hull material
Rotomolded plastic accepts through-bolts well if you use proper washers or backing. Composite hulls and thin recreational shells need more care. Inflatable material needs purpose-built attachment points.
What to do: match the fastener and backing to the shell. If the material flexes, spread the load.
2) Gear leverage
A 3-pound accessory on a short base is one thing. The same weight on a 12-inch arm is another. Leverage multiplies stress fast.
What to do: keep tall arms short unless they must be tall. Move heavy items closer to the deck and centerline.
3) Underside access
If you can reach the back of a bolt, install gets easier and stronger. If you can’t, you may need a blind insert, sealed nut, or different mounting location.
What to do: check hatches, scupper access, and compartment size before drilling. Do not assume the nut will fit later.
A lot of bad setups come from skipping one of these checks and hoping the hardware will make up the difference. It won’t. That is why kayak setup and mounting systems should be planned as one decision, not three separate purchases.
Quick check: If your kayak flexes, your gear sticks out far, or you can’t reach under the deck, change the mount plan before drilling.
Common mistakes that ruin a good kayak setup
The most common mistakes are overloading one side, drilling before measuring, and mixing too many mount types without a plan.
These mistakes don’t always fail on day one, which is why they’re so common.
Picture this: you’re excited, the parts are on the bench, and every accessory looks like it belongs somewhere on the deck. That’s exactly when a rushed install happens. The first hole is the easiest. The last repair is the hardest.
Here are the errors that cause the most trouble:
-
Mounting too high.
High gear catches wind, shifts balance, and gets in the way. Keep bulky items low unless they must be raised. -
Ignoring torque.
A rod holder or camera arm can twist under load. If the base is too small, the mount will loosen over time. -
Putting heavy gear on one side.
Offset weight makes the kayak trim poorly and can make edging awkward. -
Using the wrong fastener length.
Too short is weak. Too long can protrude where it shouldn’t or interfere with stored gear. -
Skipping sealant where it belongs.
Not every hole needs it in the same way, but water intrusion is not a myth. A sloppy hole is an open invitation for leaks. -
Buying accessories before the plan.
This is the big one. A pile of parts does not equal a rig.
A better workflow is simple:
- measure the deck first
- mark the seat and paddle sweep
- choose one main mounting method
- add only what serves a clear use
- leave room for future changes
For many kayaks, the ideal setup is not more gear. It is better placement. That is also why the best kayak setup and mounting systems usually look simpler than the shopping list.
Quick check: If your kayak feels cluttered before it even hits the water, the rig has too many parts or too many high mounts.
What tools and standards matter here?
You need basic hand tools, corrosion-resistant hardware, and a safety mindset that respects load and water exposure.
This is not a job for guesswork, even if the install looks simple.
Picture this: you’re ready to install a base, and the only things in front of you are a drill, a screwdriver, and a packet of hardware. That can be enough for a small mount, but only if you measure twice and understand the material under the bit.
Useful tools and materials include:
- tape measure
- marker or painter’s tape
- drill with the correct bit size
- screwdriver or driver bit
- marine-grade sealant where appropriate
- stainless fasteners suitable for wet use
- backing washers or plates
- file or deburring tool for cleaned edges
For safety and loading, look to recognized guidance rather than forum folklore. The U.S. Coast Guard’s boating safety resources are a good place to start for flotation and on-water safety practices, and NOAA tide and current information is useful if your setup will be used in moving water or tide-heavy areas. If you’re making a serious change to load, balance, or powered equipment, check the relevant manufacturer instructions and any local boating rules.
Useful references:
- U.S. Coast Guard Boating Safety: https://uscgboating.org/
- NOAA Tides & Currents: https://tidesandcurrents.noaa.gov/
A clean install also respects material limits. Plastic is not a steel plate. If a fastener feels like it needs brute force, that is usually a sign something is wrong with the fit, the backing, or the hole size.
If you are comparing mount styles, this is also where the earlier mount comparison becomes useful in practice.
Quick check: If you don’t have the right bits, backing, or a plan for sealing the hole, pause before you drill.
Edge cases: when the standard advice breaks down
The normal advice breaks down when the kayak is soft, the load is unusually high, or the deck layout forces a compromise.
These are the situations where a “standard” setup can look fine and still fail in use.
Picture this: the mount list is small, but the boat is odd. Maybe the kayak has a rounded deck, maybe the hatch access is terrible, maybe the gear is heavier than usual. That is where the right answer changes.
1) You need a motor or heavy battery
What changes: the load is no longer a simple accessory load; it becomes a system load.
What to do instead: use a purpose-built mounting solution, keep the battery secured low and centered, and do not rely on a light accessory track for the main support. If the motor bracket or battery placement changes trim, test it in calm water first.
2) You paddle in wind a lot
What changes: tall gear becomes a sail.
What to do instead: lower the profile of mounts, keep the heaviest gear near the centerline, and avoid tall camera arms unless you truly need them.
3) You swap between paddling and fishing modes
What changes: fixed gear becomes a nuisance.
What to do instead: use track-mounted or quick-release parts for the items that come off most often. Keep the permanent parts limited to basics like flush mounts or a single base.
4) Your kayak has very limited underside access
What changes: through-bolting gets awkward or impossible.
What to do instead: choose clamp-on, track-based, or adhesive-backed accessories designed for the surface you have. If drilling is required, move the mount to a place with access rather than forcing a bad install.
5) Your hull material is soft or inflatable
What changes: pressure points matter more than fastener strength alone.
What to do instead: spread the load, avoid sharp hardware, and stick to gear made for that hull type. A hard base on soft material is a recipe for movement and wear.
6) You fish from a narrow kayak
What changes: body movement becomes part of the mount problem.
What to do instead: keep the deck open, lower the profile, and leave room for a paddle or landing net to move freely.
A good edge-case rule is this: when the boat is unusual, the safest answer is usually the less ambitious one.
That rule keeps the kayak setup and mounting systems realistic, especially when the hull or load is outside the usual fishing-kayak range. For a final fit check, see the dry-land layout step.
Quick check: If your kayak is soft, narrow, powered, or hard to access underneath, standard mounting advice will not fit without changes.
How do you choose the final layout before drilling?
The final layout should be chosen on dry land with the seat installed, the rods in hand, and the paddle sweep checked.
That is the best way to catch bad reach, bad angle, and bad clearance before the first hole is made.
Picture this: the gear is laid out, but nothing is fixed yet. That is the moment to pretend you’re on the water. Sit in the kayak, hold the paddle, reach for the rod holder, and imagine landing a fish while moving your torso. If the layout feels cramped on shore, it will feel worse afloat.
Use this final check:
- Sit in the kayak with your full seating setup. Include the seat position, footrests, pedal drive, or any cushion you actually use.
- Place the gear where it might go. Use tape, cardboard, or temporary clamps before drilling anything.
- Check paddle clearance. Make sure the paddle blade won’t hit rod holders, screens, or brackets during a normal stroke.
- Check reach and visibility. You should be able to see the display and grab the gear without leaning too far.
- Check balance side to side. If one side gets crowded, shift the heaviest parts toward the centerline or the opposite side.
- Confirm hatch access and cable routing. Open every hatch you’ll need after the install, not before it.
A smart layout usually follows a simple rule: fixed gear near the base, adjustable gear where the hand can reach it, and bulky gear out of the stroke path. If a setup breaks that rule, it needs a strong reason.
A lot of people ask for the “best” setup. The better question is whether the setup still works after a fish hits, the wind picks up, and you need your hands fast. That is the test that matters.
Once you can answer those questions on land, the rest of the install is much less risky. For related planning, return to the mount-choice section.
Quick check: If you have not sat in the kayak and moved through a full paddle motion, the layout is not ready.
What is the simplest good setup for a beginner?
The simplest good setup is one or two mounts, low weight, and no drilled holes until the kayak proves where the gear should live.
That gives you room to learn without filling the deck with hardware you won’t keep.
Picture this: you’re new to kayak rigging and you want a clean result, not a complicated project. Start with the one accessory you will use every trip. For many people, that is a rod holder or a small electronics mount. Add a second part only after the first one feels right.
A beginner-friendly order looks like this:
- choose one main use: fishing, filming, navigation, or simple storage
- pick the smallest mount that solves that use
- keep the gear low and close to the seat
- avoid drilling until the layout has been mocked up
- upgrade only when the first setup shows a real problem
That approach saves time and money because it stops you from overbuilding the kayak. It also makes future changes easier. A clean first install is easier to expand than a cluttered one that needs to be torn out.
Who this is not for: if you already run multiple rods, a fish finder, a battery, and a crate, you need a full rig plan instead of a beginner setup.
The same logic also applies when you are choosing between track, flush, and through-bolt hardware, so it connects back to the core question of kayak setup and mounting systems.
Quick check: If you only need one or two pieces of gear, keep the rig simple and leave room to change it later.
FAQ
What is the best mounting system for a kayak?
The best mounting system depends on the kayak and the gear, not on the mount label. Track mounts are best for gear you move often, through-bolts are best for fixed strength, and flush mounts are best for low-profile hardware. The right answer is the one that fits the hull and does not block your stroke or access.
Do I need to drill holes in my kayak?
No, not always. Track mounts, clamp-on accessories, and some removable systems can do the job without drilling. Drilling is worth it when you need a permanent, stronger connection or when the accessory’s position will not change. If you do drill, plan the hole location carefully and check for underside access first.
Where should I mount a fish finder on a kayak?
Mount the display where you can see it without twisting hard, and put the transducer where it reads clean water flow. That often means a track-mounted arm for the screen and a separate, carefully placed transducer mount. Keep cables short, secure, and out of foot traffic.
Are track mounts strong enough for kayak fishing gear?
Yes, for many common accessories, track mounts are strong enough if they are used correctly and not overloaded. They work well for rod holders, cameras, and electronics arms. They are not the best choice for heavy loads with long leverage unless the track and hardware are rated for it.
What is the biggest mistake people make with kayak mounts?
The biggest mistake is planning the mount before planning the load and reach. People often drill first, then discover the gear blocks a paddle stroke, shifts the boat off balance, or sits where it can’t be reached. A dry-land mockup prevents most of those problems.
Drafted with AI; not yet reviewed by a person.